Introduction
This article walks through the process of setting up a virtual appliance within Azure. If your organization was scoped for this virtual appliance type, it will be available on the MDR Portal's Downloads page. See How Field Effect MDR Works and our Virtual Appliances Overview for more on network appliances, the difference between primary and secondary, system requirements, and more.
This article covers the following:
System Requirements
See our Virtual Appliances Overview to see the minimum requirements for virtual primary and secondary appliances.
In order for the virtual appliance to function, it requires outbound internet access to connect back to Field Effect's services.
Primary appliances should use the following specifications:
- Instance type: Standard_D4ds_v5
- Storage: 1024 GB, SSD
Secondary appliances should use the following specifications:
- Instance type: Standard_D2ds_v5
- Storage: 512 GB
If you have requirements outside of this, please contact support@fieldeffect.com.
Procedure
The following sections outline the steps required to set up a virtual appliance in Azure.
Download the Installer File
Partners: download files are available at the client level. Ensure that the organization selector is set to the appropriate end-client when downloading files.
Log into the MDR Portal and navigate to the sidebar's Downloads page.
If your organization was scoped with an Azure virtual appliance, a cloud-init user data YAML file will be available.
Download this file and rename it "cloud-init-covalence.txt".
Set up the Virtual Appliance (Azure)
This process uses the Azure CLI so the size of the operating system (OS) disk can be specified. See System Requirements for more.
The commands below assume a bash shell – either via the Azure Cloud Shell or local Linux/WSL environment using the Azure CLI.
The following commands are provided as an example, and as such, they will need to be tailored to your specific Azure tenant (specific subscriptions, etc.).
1. Open a command prompt and create a new working directory called “covalence-setup” using the following command: cd covalence-setup
2. Copy the "cloud-init-covalence.txt" file (see Downloading the Installer File) from above to this directory as cloud-init-covalence.txt
3. Install Azure Command Line Interface (CLI) if not already installed (Installing Azure CLI)
4. Login to the CLI using the following command az login
5. Create a resource group in your preferred region using the following command (ensure to set your organization's region):
az group create \
--name covalenceResourceGroup \
--location eastus
6. Create the VM using the following commands. The SSH keys and “admin-username” argument are superseded by the cloud-init configuration, but they need to be provided. Change the ‘os-disk-size’ argument and ‘size’ argument depending on guidance from Field Effect:
az vm create \
--resource-group covalenceResourceGroup \
--name Covalence \
--image Canonical:ubuntu-24_04-lts:server:latest \
--custom-data cloud-init-covalence.txt \
--size Standard_D4ds_v5 \
--admin-username covalence-admin \
--nsg-rule NONE \
--generate-ssh-keys \
--public-ip-sku Standard \
--os-disk-size-gb 1024
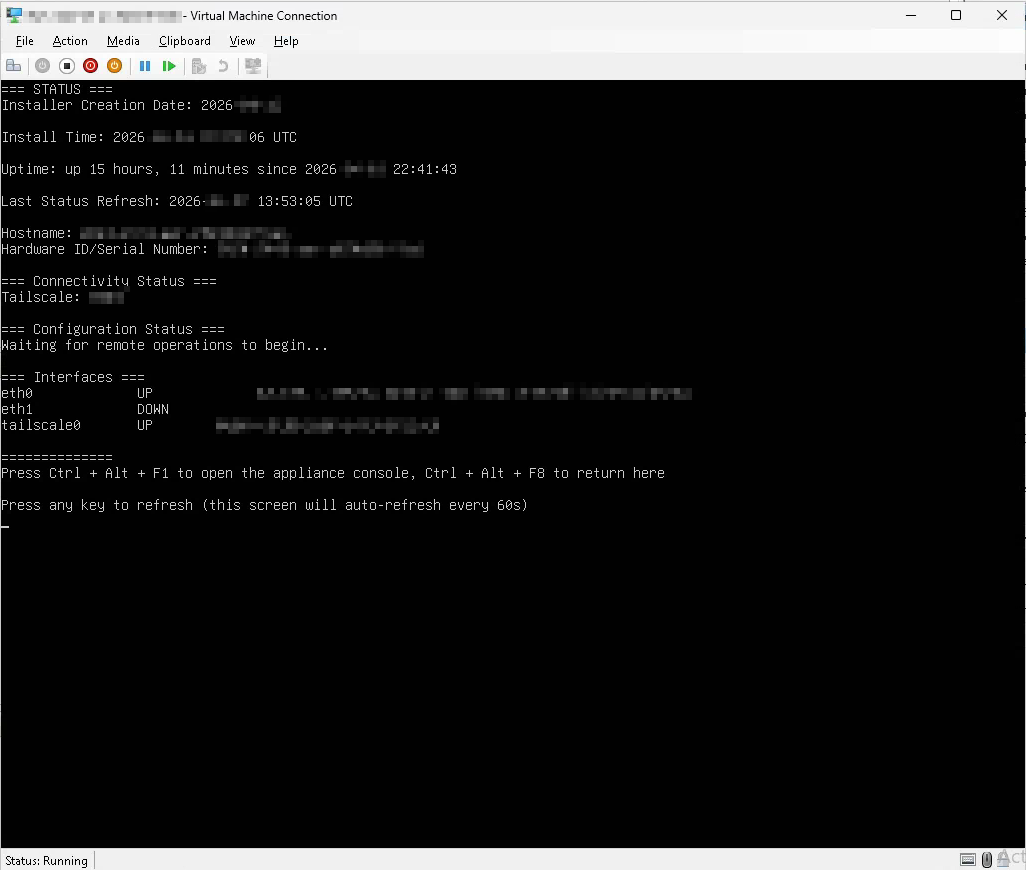
At the end of the process, you will see a confirmation screen that displays information about the appliance. Ensure that the connectivity status is active and connected. If you have any issue with the connections, use Ctrl+Alt+F1 to open the appliance console to investigate further.
Traffic Monitoring Configuration in Azure
Please reach out to support@fieldeffect.com to configure traffic monitoring, as it requires custom configuration by our support and operations teams. There are some options available for traffic monitoring:
Packet Capture via Azure Network Watcher.
This functionality is limited to 10 VMs per region, per subscription.
The virtual appliance does not act as a NAT gateway by default - this requires additional configuration and coordination with Field Effect.
Was this article helpful?
That’s Great!
Thank you for your feedback
Sorry! We couldn't be helpful
Thank you for your feedback
Feedback sent
We appreciate your effort and will try to fix the article