Introduction
This article is meant to assist you with setting up and deploying the macOS Field Effect MDR agent using Intune.
This article covers the following topics:
Requirements
For this procedure, you’ll need to:
- Download the appropriate installer from MDR Portal's the Downloads page.
- Create three Intune profiles.
- Deploy the endpoint agent to your organization's endpoint.
For more on downloading installers, see The Downloads Page.
The table below describes each Intune profile you will need to create - and what they are used for. It also provides the location within the macOS installer bundle (available on the Downloads Page).
| Profile Name | Profile Type | Description | Installer Bundle Location |
|---|---|---|---|
| Field Effect MDR License | Preference | This profile contains the actual license.co file. | \macos\intune\covalence_license.plist |
| MDR System Extension | Extensions | This profile is specifically responsible for the extension. | \mdm\macos\generic\covalence_sysext.mobileconfig |
| MDR Full Disk Access | Custom | This profile allows Field Effect MDR full access for monitoring. | \mdm\jamf\covalence_tcc.mobileconfig |
Create the Intune Profiles
Begin by navigating to Home > macOS > Configuration profiles. From this page, click + create profile and create the profiles outlined in the table above.

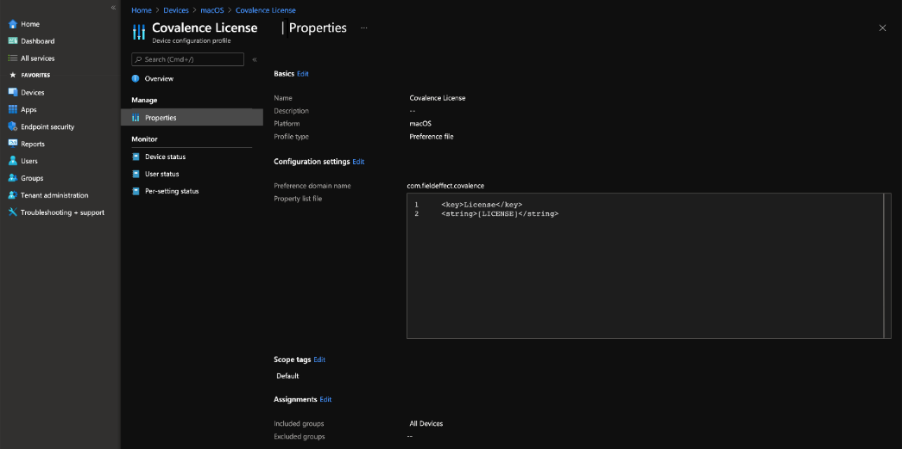
Create Profile: Field Effect MDR License
Follow the steps below to create a preference profile named “Field Effect MDR License” and add the contents of the macOS installer bundle's licensing plist file (macos/intune/covalence_license.plist) to it.
- In Intune, go to Devices, and under Manage Devices, select Configuration.
- Under Configuration profiles, select Create Profile.
- On the Policies tab, select Create > New Policy.
- Under Platform, select macOS.
- Under Profile type, select Templates.
- Select Preference File, and select Create.
- On the Basics tab, Name the profile and enter a Description. Then select Next.
- On the Configuration settings tab, select device for the Deployment Channel.
- For the bundle name, enter “com.fieldeffect.covalence”.
- For the Configuration profile file, upload the "mdm/intune/covalence_license.plist" file.
- On the Assignments tab, assign the profile to a group where the macOS devices or users are located.
- Review the configuration profile. Select Create.
Create Profile: MDR System Extension
Follow the steps below to create an extensions profile named “Field Effect System Extension” and add the contents of the macOs installer bundle's mobile config file (macos/generic/covalence_sysext.mobileconfig) to it.
- In Intune, go to Devices, and under Manage Devices, select Configuration.
- Under Configuration profiles, select Create Profile.
- On the Policies tab, select Create > New Policy.
- Under Platform, select macOS.
- Under Profile type, select Settings catalog.
- Select Create.
- On the Basics tab, Name the profile and enter a Description. Then select Next.
- On the Configuration settings tab, select + Add settings.
- Under Template name, select Extensions.
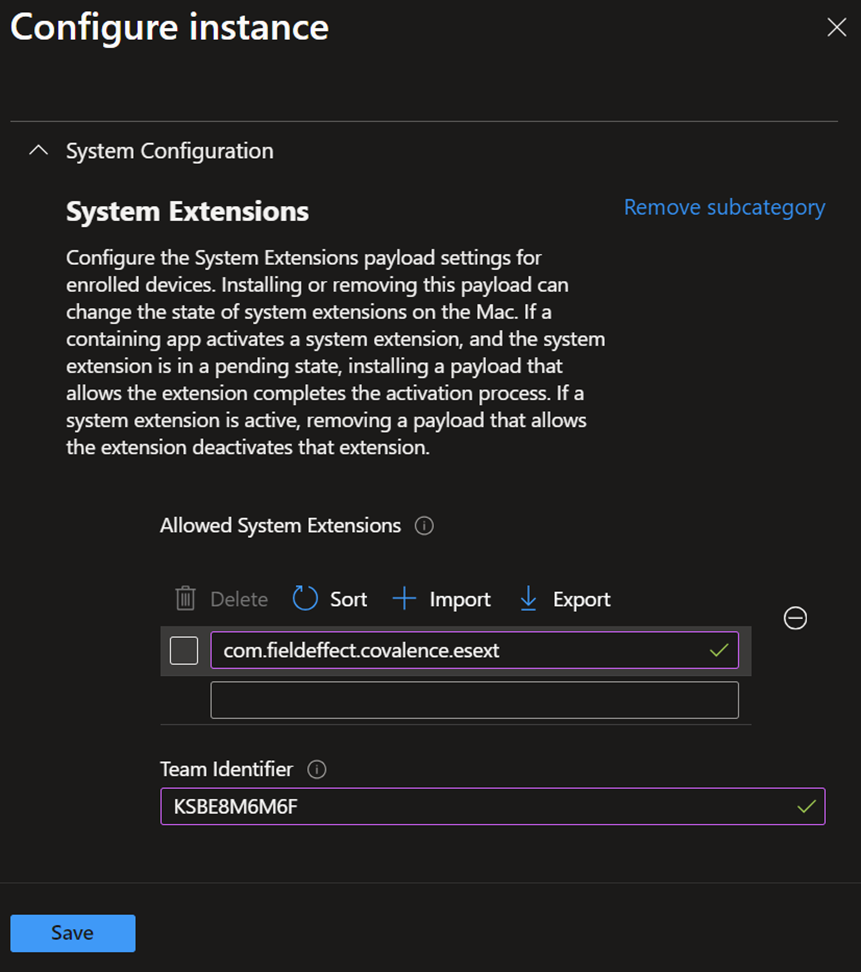
- In the Settings picker, expand the System Configuration category, and then select System Extensions > Allowed System Extensions:

- Close the Settings picker, and then select + Edit instance.
- Configure the following entries in the Allowed system extensions section, and then select Next.
- Expand the table and input the following:
- Allowed System Extensions: com.fieldeffect.covalence.esext
- Team identifier: KSBE8M6M6F
- On the Assignments tab, assign the profile to a group where the macOS devices or users are located.
- Review the configuration profile. Select Create.
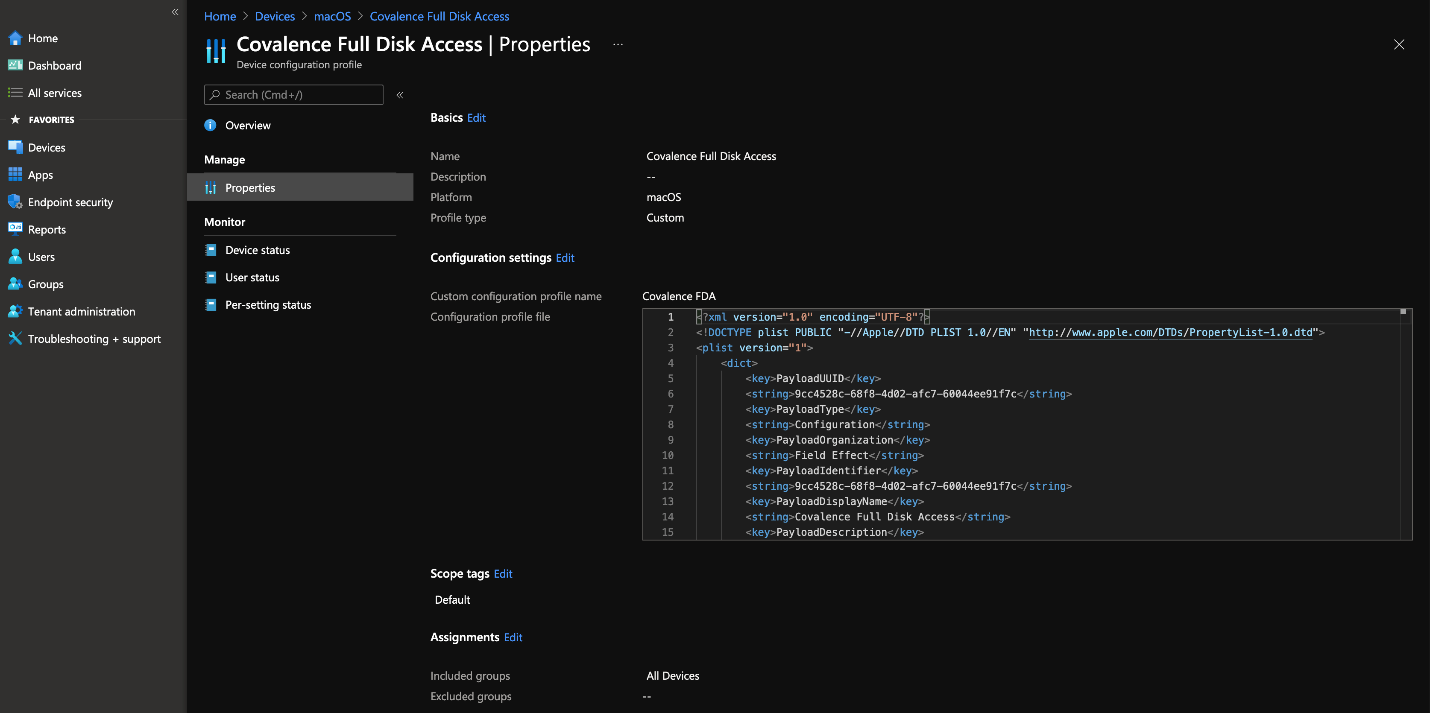
Create Profile: MDR Full Disk Access
Use the steps below to create a custom profile named “Field Effect Full Disk Access” and add the contents of the macOS installer bundle's mobile config file (macos/generic/covalence_tcc.mobileconfig) to it.
- In Intune, go to Devices, and under Manage Devices, select Configuration.
- Under Configuration profiles, select Create Profile.
- On the Policies tab, select Create > New Policy.
- Under Platform, select macOS.
- Under Profile type, select Templates.
- Select Custom, and select Create.
- On the Basics tab, Name the profile and enter a Description. Then select Next.
- On the Configuration settings tab, select device for the Deployment Channel.
- For the Configuration profile file, upload the "\mdm\jamf\covalence_tcc.mobileconfig" file.
- On the Assignments tab, assign the profile to a group where the macOS devices or users are located.
- Review the configuration profile. Select Create.
Full Disk Access granted through Apple MDM Configuration Profile is not reflected in System Settings > Privacy & Security > Full Disk Access. It does not show items that have that access granted via an MDM deployed Configuration Profile.
Deploying Agents to Endpoints
Navigate to Home > Apps and add the MDR macOS .pkg as a macOS Line-of-Business (LOB) app.

Upload the provided .pkg installer (accessible via the Field Effect MDR Portal) to Intune as the app package file.
Use the settings outlined in the image below for your Field Effect MDR Intune app. After configuring the settings of your MDR Intune App, click Next.

You’ll be taken to the assignments page, where you can assign which groups, users, and devices will receive updates via Intune. After making your assignments, click Next.

Review the configuration for your app, and when ready, click Create. This will create the app in Intune and begin deploying the agent to your assigned group, users, and devices.

Was this article helpful?
That’s Great!
Thank you for your feedback
Sorry! We couldn't be helpful
Thank you for your feedback
Feedback sent
We appreciate your effort and will try to fix the article